We had a rash of freezers failing around the department, and I wasn’t going to become a victim. So I built something simple that has proven it’s worth. For a total cost of less than $100 you can sleep easy knowing your freezer door hasn’t been left open.
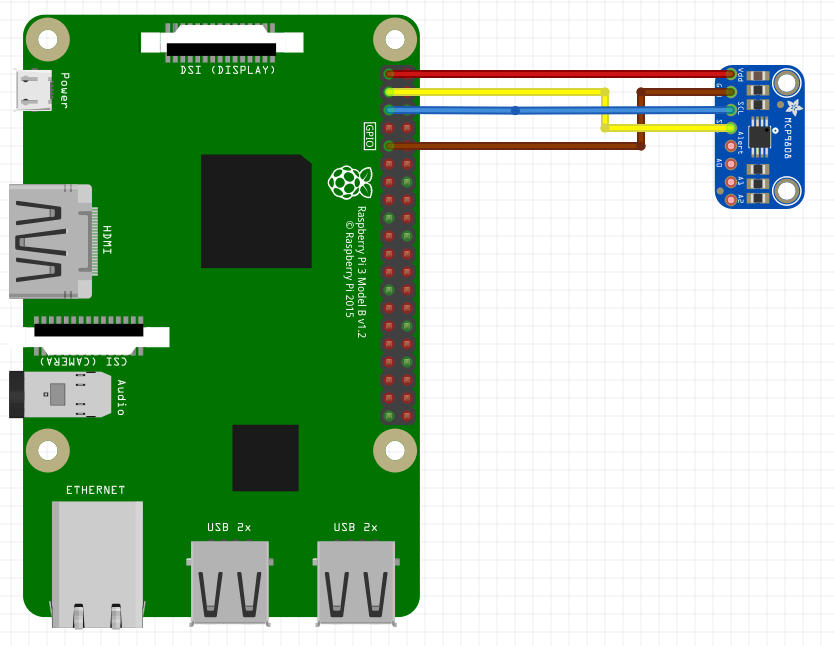
The electronics are dead easy: You buy an MCP9808 breakout board, and you connect it to a Raspberry Pi. The MCP9808 is a high accuracy thermometer that communicates via the I2C protocol, something that the Raspberry Pi supports natively. You solder wires to the Vdd, GND, SCL, SDA pins of the breakout board, and connect them to pins 1 (3.3 Volts), pin 9, pin 5 and pin 3, respectively, making sure that the wires are long enough to reach inside the fridge from where you can mount the Raspberry Pi. It’s also probably a good idea to coat the breakout board in silicon sealant.
In order to setup the Raspberry Pi, you first need to turn on SSH, so you can remotely access the Pi once it is in place, and turn on the I2C interface. In order to do that, turn your Pi on, log in, and run sudo raspi-config. It should be pretty obvious what to do: go down to advanced options, and SSH and I2C are both there.
Now you need to install python support for the MCP9808. In the terminal, type
sudo apt-get update
sudo apt-get install build-essential python-dev python-pip python-smbus git
sudo pip install RPi.GPIO
cd ~
git clone https://github.com/adafruit/Adafruit_Python_MCP9808.git
cd Adafruit_Python_MCP9808
sudo python setup.py install
With that done, confirm that it is all working with:
cd examples
sudo python simpletest.py
Where you should see the temperature at the sensor printing out. Press Ctrl-C to quit.
Now I suggest you set up a gmail address specifically for your freezer. It’s not hard. Also, we’re going to save the gmail password in a public folder, so you’re password will be wide open. So I REALLY suggest you set up a gmail account for the freezer. You also need to go to log into the account and turn on access for less secure apps (I think).
Get back to your home directory, and open a new file called read_temp.py
cd ~
sudo nano read_temp.py
And put in the following code, while changing the relevant lines about who you want to send the emails to (the variable emails, on line 20), and the details of your new, freezer specific email address (line 29 to 38).
#!/usr/bin/python

import time
import Adafruit_MCP9808.MCP9808 as MCP9808
import smtplib
from collections import deque
from email.mime.text import MIMEText

#print '**************************************'
#print '-----EXECUTING TEMP SENSOR SCRIPT-----'
#print '**************************************'


#Connect to i2c sensor with default pins (SCL=P9_19, SDA = P9_20)
sensor = MCP9808.MCP9808()

#Initialize sensor
sensor.begin()

emails = 'email1@gmail.com,email2@gmail.com,email3@gmail.com' #comma separated values

temp_buffer = deque(maxlen=4) #4 position buffer for the last four reads


def send_mail(address, string):
    #This should really be in a try statement
        text = string
        msg = MIMEText(text)
        me = 'YOUREMAILADDRESS@gmail.com'
        them = address
        msg['Subject'] = 'Temperature Warning'
        msg['From'] = me
        msg['To'] = them
        mailserver = smtplib.SMTP("smtp.gmail.com", 587)
        mailserver.ehlo()
        mailserver.starttls()
        mailserver.ehlo()
        mailserver.login("YOUREMAILADDRESS@gmail.com", "PASSWORD")
        mailserver.sendmail(me, msg['To'].split(','), msg.as_string())
        mailserver.close()
        #print 'Email Sent'

def mean(l): #The worlds silliest function
    return sum(l)/len(l)

def buf_to_str(buf):
    string = ""
    for el in buf:
        string = string + str(el) + ", "
    return string

def check_temp():
    temp = sensor.readTempC()
    temp_buffer.append(temp)
    if mean(temp_buffer) > -10:
        string = "The temperature is currently " + str(temp) + ". The last four readings have been " + buf_to_str(temp_buffer) + ". The time is " + time.strftime('%H:%M:%S')
        send_mail(emails, string)
    time.sleep(60)

while True:
    check_temp()
Press Ctrl-X to exit, and confirm the save. Confirm that works properly with sudo python read_temp.py.
Now we need to set it up, so this runs on startup. We should set up a bash script to execute this script, so in the terminal, type sudo nano launcher.sh. Then type in the following:
#!/bin/sh
sleep 10
sudo python /home/pi/read_temp.py
We need to set that file to be executable, so type sudo chmod 777 launcher.sh. Finally, we need to launch that file on startup. So enter sudo nano /etc/rc.local and at the end of that file (but before the exit 0 line), type:
/home/pi/launcher.sh &
Making sure that the final line of that file is exit 0. Press Ctrl-X to exit, and then save.
And that should be that. Mount your Pi somewhere around the freezer, get the wires in through the door seals without distrupting them too much, and hang the sensor somewhere senisble, so it doesn’t get in the way too much. Make sure your Pi is connected to the internet, and you should get emails whenever the freezer gets too warm.
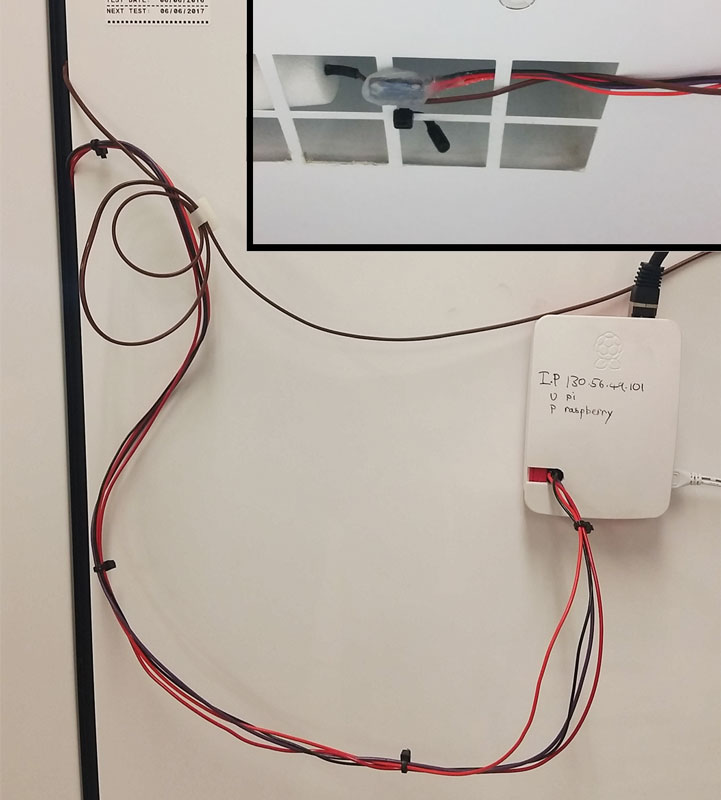
Raspberry Pi mounted on the outside of the freezer. Inset: Silicon coated MCP9808 inside the freezer.
If you give this a try, and it’s not working, I’m happy to try to help, but I’m no Unix expert, so I can’t promise I’ll be any use.
Thanks Bill – this is incredibly useful.
For me, it almost worked out of the box, except that:
1. I had to add the call to check_temp()
2. I had to to allow “less secure apps” on the security settings of the gmail account
Whoops, I missed off three lines when I copy/pasted the code. Thanks for pointing that out!!!
Oh, and I’d forgotten you need to change the gmail settings.
Anyone know if there are available temp sensors for the ultra low freezers? They are usually the ones that are very unloving of unfreezing. I was entertaining the notion of try to make a DIY ultra low freezer alarm, but gave up on it once I found the Testo made a relatively inexpensive one for around ~300-500 usd. Testo Wi-fi or smth.
Good question Alex. I don’t know of any breakout board that will give function down to -80. 300 bucks for a turn key solution seems reasonable, but for 500 or more? Id look to build it myself. The chips they use *will* be available publicly.
I am thinking this may work in similar fashion:
https://www.adafruit.com/product/269
I presume that if you point the same(-ish) code to this python library:
https://learn.adafruit.com/max31855-thermocouple-python-library
you could do something similar for an ultra-low freezer, using a k-type thermocouple. I tried this breakout board in the past in stand-alone mode, and its default example is a steady readout of temperatures just as the MCP9808 does. Might just need some calibration.
Alex, what setup did you go for from Testo? I am trying to solve the same problem without having a wire under the gasket.
Bill, Thanks so much for this guide, Very helpful!
One question: Is there a way to switch it to email F instead of C? I know with the test script it shows both but in the emails I am only getting C.
Thanks again!
Change line 53 from
temp = sensor.readTempC()
to:
temp = sensor.readTempC() * 1.8 + 32
There is no function like sensor.readTempF(), as far as I know.
I love the simplicity of this design.
How would you modify it for multiple sensors?
Eg, I have two freezers and a refrigerator.
I also see potential to monitor temperatures around the home or indoor/outdoor.
Re: Multiple sensors. So theoretically, with I2C, you just solder in another MCP breakout board and your should be able to connect to two at the same time. HOWEVER, you need to do one thing: connect one of the A0/A1/A2 pins to the voltage supply. By doing this, you are telling the MCP breakout board to use a different “address”. The exact details of this aren’t worth going into, but the point is that you can theoretically connect up to 127 (or is it 1023?) I2C devices all to the same three wires, but they each must have different “addresses”, which allows the I2C master (the raspberry pi in this case) to talk to each one individually.
Now exactly what will happen when it comes to the code, I’m not 100% sure. My belief is that on the line >> sensor = MCP9808.MCP9808(); you will connect to the MCP with the default I2C address (i.e. the one you haven’t connected any of the address pins to the voltage supple). Then you need to connect to the others with >>sensor2 = MCP9808.MCP9808(ADDRESS) where ADDRESS is the i2c address of the other MCP (probably as a hexidecimal value). This page on Adafruit shows you how to calculate the address depending on which address pins you connect to Vsupply.
Bill –
Great code and exactly what I was looking for. I am no programmer, just a code re-user, so I have a couple basic questions.
As it sits, I am getting an email every minute (which I can change with the time.sleep setting) with the current temp, last four temp readings and time.
In reading the code and the webpage, I thought the intent was to get an email when the temp is > -10 degrees above the mean (I assume the mean is being calculated against the previous 4 readings?).
When I test, I run the simpletest.py in a terminal window and set my warm coffee cup on the MCP9808 expecting to receive an email when the temp goes greater than 10 degrees above mean (in this case ambient room temp).
The only changes I have made to your original script are the email addresses, convert to F readings and I currently have set the time.sleep setting to 600.
When time.sleep was set to 60 and I tested, I continued to get emails every minute telling the current temp, last four temp readings and current time. I did not receive one specifically due to the >10 degree threshold being breached.
That is not happening and I can’t seem to understand or find out why.
Is my understanding of the purpose incorrect?
Any suggestions?
I know I’m 6 months too late and hopefully you’ve got it solved by now. You’re not interpreting the comparison properly. It’s not tracking the mean and then using that as a reference, it’s comparing the mean to an absolute value of -10. If the mean of the values stored in the buffer is greater than -10 then it will send an email.
In your case you’ll probably want to use something like 5 since you’re converting to F.
Thanks for the write up on this. I was able to do this as my first pi project.
One question though, on the picture above, has the sensor been encased in silicon or something?
Or is it just placed in the freezer?
Thanks
First project? Excellent!
Yes, the whole i2c module is thickly coated in silicone. Some modules probably come with a conformal coating of some elastomer, but most of them won’t.
Thanks for this, it was a great starting point. I just built one to track my two freezers while I’m gone on vacation. This is so much more flexible over buying a finished product. It was really easy to setup two sensors and I chose to use push notifications to my phone vs. emails.
Great write-up, Thanks!
Got this working on a Pi Zero W
(had to get some new tools to solder such tiny boards)
Thanks so much for this! I’m trying to use it to monitor the temp in an incubator that’s prone to going to extremes with no warning. So far, everything’s working for me. As I understand it, if I just wanted to remotely check on the temp, I’d have to connect to the pi, run “sudo python read_temp.py”, and then when I’m done and want to sign off, I should run “sudo reboot” so that the read_temp.py program starts running again when I disconnect. Is this right?
Hi KT,
Sorry for the late response. No, that is not correct. read_temp.py runs all the emails and checking scripts. If you want to just check the temperature, run
cd examples
sudo python simpletest.py
Press cntrl-c to quit, and then a restart is best (I’m not sure what would happen if both simpletest.py and read_temp.py tried to access the termometer at the same time… it may crash read_temp.py).
This worked great for me. I’ve had three chest freezers die in the labs I’ve been in over the years, so I installed this one in the one at my house 🙂 Thank you for putting this all together and sharing.
Glad to be of help. Though if you’re doing this on your own fridge (and hence have to pay for power) think carefully about how you get those cables into the freezer. Fine cables would probably be good.